Running WHS on Server 2008 Hyper-V Part 2
I have looked at everyone’s comments from part 1 and have to say I agree with them, so I want to clarify what it is I am trying to convey. Hyper-v isn’t going to be for everyone, I except that, and I also except that hyper-v is not going to be for the average user that only uses WHS for just backing up, maybe a laptop and desktop, then maybe accessing some files on their WHS from work. At the same time, that same person, probably won’t be reading this article, this article is for enthusiasts, professionals and anybody else interested in enhancing their use of not just WHS but a completely different way of working with multiple OS’s.
I want to clear a few things up now, firstly I mentioned in part 1 that hyper-v offers more flexibility, and by this I mean gives you more control over how much how much RAM, Disk Space and most importantly what percentage of the CPU is allowed to be consumed by a virtual WHS. These three things are extremely important for me in order to use my server effectively and efficiently. The reason for this is I might want to allocate a higher percentage of RAM and CPU resources, to my Virtual Server 2008 Active Directory machine, because I know I am going to have people remotely accessing this server for use with terminal services. I understand that not many would have this scenario play out, but the principles are there for you to apply this to your own situation.
Energy saving was something else that was commented about in part 1, energy savings are none comparable to having 3 or, maybe 4 separate machines, each having powered at one time a Hard Drive, Motherboard, CD drive and other additional devices. This again is not a direct reflection of WHS but multiple OS’s combined, with effective use of resource allocation as above, makes for a major saving in electricity bills. Again I except that this is not the case for the average user, but from experience the majority of WHS users are professionals and enthusiasts at the moment, all of whom this article is applicable.
Ok then so picking from part 1, you should now have hyper-v installed on your machine, if you have had any problems installing hyper-v you can see full instructions here, these instructions are from a beta install but haven’t changed since as you only need to follow from 1 – 4. I do just want to point out at this stage, if you are running windows 7 pro or ultimate, you will need to download the “Remote Server Administration Tools for Windows 7” and install, this will provide you with the hyper-v remote management console.
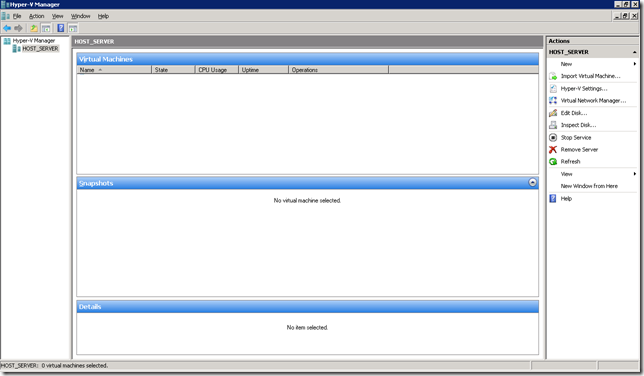
You should now be looking at your console as below, you should also be able to see that I have called my hyper-v server “HOST_SERVER” the name of your server should be displayed here at the moment.
Now all you need to do is create a virtual machine and install WHS. First of all you will see in the far right hand side “New”, click New and then “Virtual Machine”
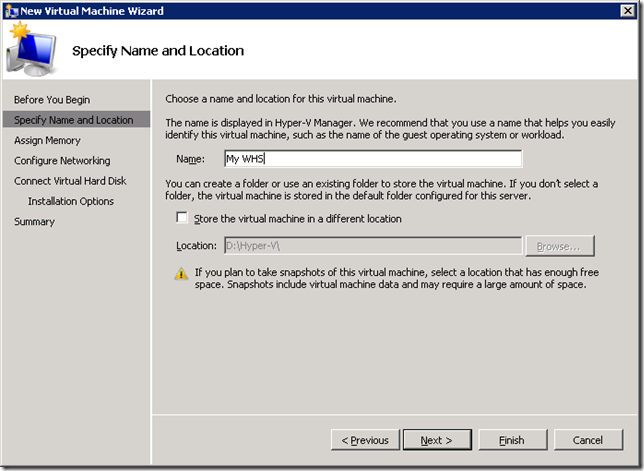
You should now see the above, enter a name for your Virtual WHS and change the store directory where relevant, and then click next.
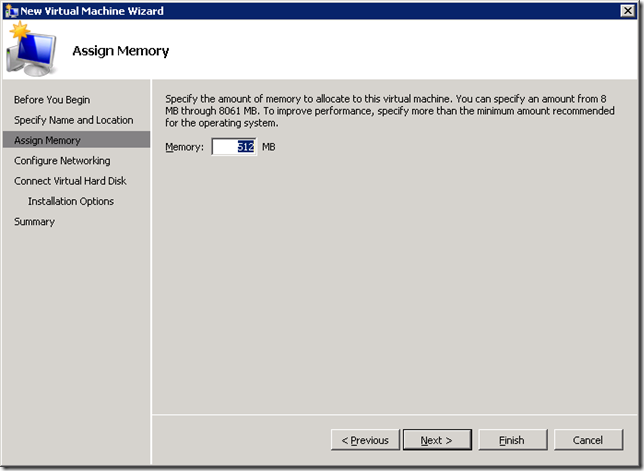
You can now allocate the amount of RAM you wish your Virtual WHS to use, I would advise around 2GB if possible, then click next.
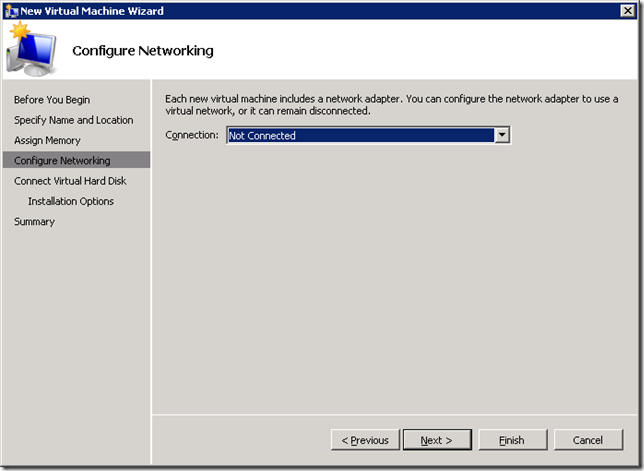
You are now able to select your network adapter, at the moment we have not set this up, so leave as “Not Connected”.
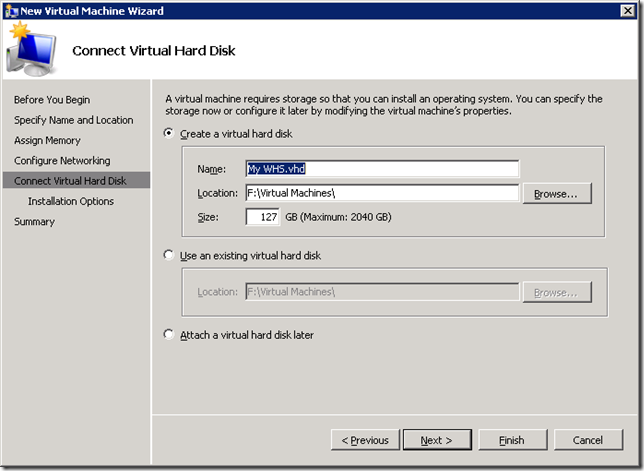
At this point it asks you about a Virtual Hard Drive, from here you can create, use existing or attach one later.
You will also notice that it is asking how much space you would like to allocate to the drive. Now, don’t worry too much, this can be changed later, so you can extend the amount of space within the drive, even after WHS has been installed, although you will need some partition editing software such “Acronis Disk Editor” so this isn’t a screen to get hung up about. My advice at this point is, if this is the first virtual disk you are creating for your virtual WHS, and for most of you it will be, I would allocate a small amount of disk space maybe around 40GB – 60GB, for reasons I will go through later, just remember this space isn’t instantly taken from your physical hard drive, the virtual disk grows as you add data to the Virtual Disk through WHS this is called a Dynamically Expanding Virtual Disk.
Once you have done click next.
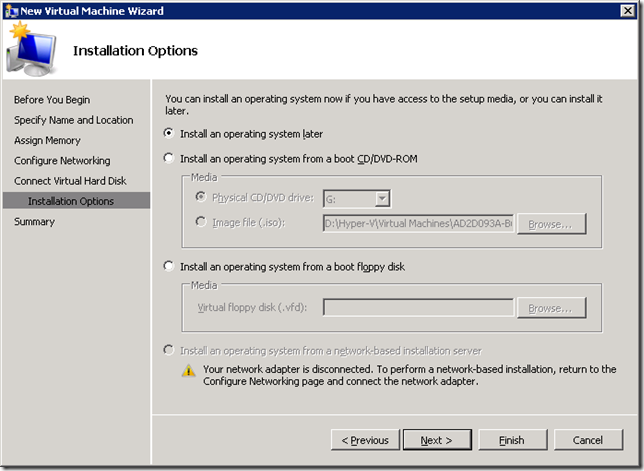
At this stage you are able to install an OS immediately using an ISO, Physical Disk, Virtual Floppy or a Network Install. I always choose “Install an Operating System Later” the reason for this, is I like to look over the settings of the virtual machine before it is booted, also we still need to add a network adapter that we haven’t yet setup.
Once you have clicked finish you should see the Virtual WHS in the Management Console, and in the top right hand side you will see “Virtual Network Manager” click here to open this and to create your virtual network adapter.
Now at this point I want to point out the importance and advantages of having 2 network adapters in your host server, 2 network adapters allow for 1 to be used for all your virtual machines including WHS, and 1 solely dedicated to your host server. The advantage of having a separate network adapters for the host server is that internal remote administration and management of the host server can be done on one network adapter, and all other communications for guest sessions will occur over a different network adapter. This setup provides isolated administrative control to the host server from the direct access, communications, and control of the guest sessions. The other reason in a different environment such as business, with only one adapter, once one person has control on that network, they could then take full control of the host server, and all other virtual machines running on that host server, but that is a completely different example altogether but still a se
curity feature never the less.
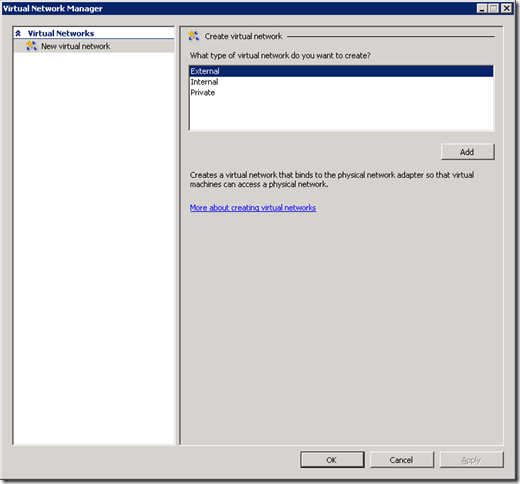
You should new see the above, there are three different types of adapters you can create, but we are just using external, so select and click “add”.
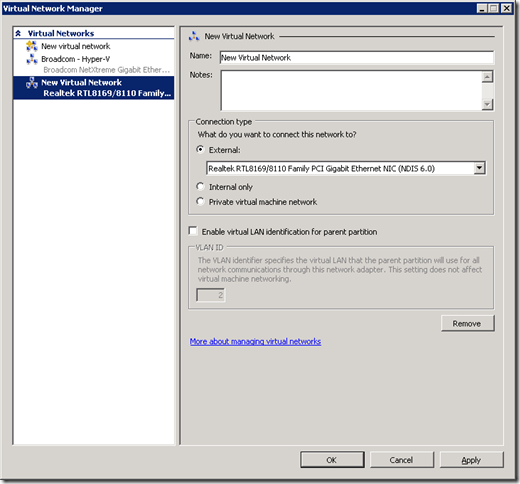
Now you get to name your adapter whatever you like, select the relevant external adapter you are going to use for your virtual WHS, remember if you have 2 adapters try and leave one completely separate from your virtual machines.
Once you are done click ok.
Now in the Hyper-v management console, right click your virtual WHS machine and select settings.
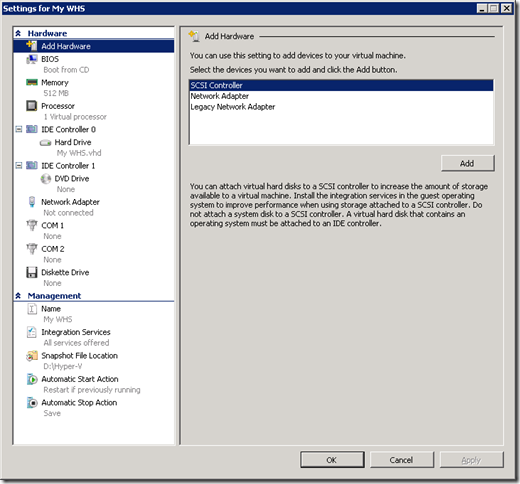
Here you can check all the settings for your virtual WHS, also you can assign the network adapter you have just created, change RAM and BIOS settings that sort of thing.
At this point we have only got one hard drive assigned to the virtual WHS, and for the installation that’s all you really need, I would advise adding more virtual hard drives later after the install, I will explain why and go through the install in Part 3.
Matthew Glover
www.matthewglover.co.uk
Share this WHS Article with Others:


Thanks for the clarification. Very detailed post. I’m looking foward to the next part.
I was wondering if you have the Hyper-V Server running in a domain environment or workgroup?
I was wondering if Hyper-V had the same hardware monitoring as WHS did. (or really, as good of a notification scheme, I guess I could settle for e-mail notifications but a bubble from the system tray would be better for me).
Hello. I just completed my installation of Windows Home Server in a Hyper V VM on 2008 R2. I did it this way so I can still have the ability to use my server for other OS’s as WHS will not max out the server.
Here is my post on it.
http://tsells.wordpress.com/2009/11/07/setting-up-windows-home-server-in-a-vm-on-win-2008-r2-2/
when is part 3 coming, I am tinkering with this as i have a server set up at home and went with server2008 r2 x64 so i can do everyhthing else in VM’s, giving me flexibility going forward.
I just build my new machine with intel i7, 8 gig of RAM, board with USB3 and SATA3, and very good GPU. This computer will be my primary server/desktop at home for software development and personal staff (playing games, media server etc.). I already have HP ex470 as my WHS but I’m looking to sell this machine and planning to move it on the win 2008 R2 installation using hyper-v. This will help me to conserved electricity with the combined machine. Everything looks good, I’m now running the WHS on hyper-v. The only thing I’m missing is that my host machine is win 2008 and I’m having some hard time to configure it as desktop as possible and driver is also hard to configured (bluetooth, tuner card..), no media center I need it for TV recording. If only Microsoft add the hyper-v on windows 7 which has more desktop experience, it would be my perfect machine. I know Windows 7 already have Virtual Machine but it has limited features compare to hyper-v like physical mounting of hard drive, very important for WHS, doesn’t run as windows server and list goes on.