WHS Migration Assistant Pro 1.01
Mediadogg Software have just released Windows Home Server Migration Assistant Pro, a tool to help you in the planning of the data move from WHS v1 to WHS2011.
In addition to the planning functions, the WHS Migration Assistant (WHS2WHS) has functions for partially automating the actual data movements and other functions for saving, restoring and printing multiple plans. And although WHS2WHS Pro does not directly copy, erase nor move any data. It provides a planning template as well as a framework for invoking other tools, using the plan as a guide.
Here’s the details:
Method of Operation:
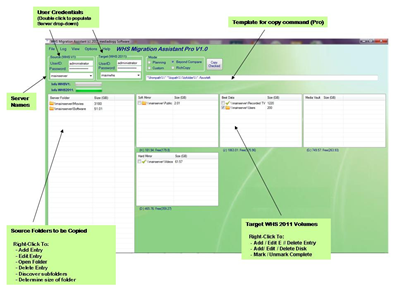
Think of the move operation as going from left to right. WHS2WHS presents a screen that shows the shared folders from the source WHS system on the left, and the Volumes (drives) associated with the WHS 2011 system on the right. This is due to the fact that WHS 2011 uses a different scheme for managing shared folders. Instead of locating folders on a large pool of data that Drive Extender maps onto multiple drives, WHS 2011 requires the administrator to allocate shared folders to logical disk volumes, which usually correspond directly to physical disk drives, but not necessarily. Technologies such as RAID can be used to create logical volumes with various reliability and performance attributes comprised of multiple physical drives. WHS 2011 works with the logical drives (or “volumes”).
WHS2WHS supports two basic scenarios for operation:
A. Both Source and Target folders are network shares (e.g. “\\SourceServer\Movies” and “\\TargetServer\Movies” )
B. Source folders are network shares and Target folders are WHS 2011 folder names on local volumes (e.g. “\\SourceServer\Movies” and “D:\\ServerFolders\Movies” )
WHS2WHS automatically formats path names to handle these scenarios, regardless of where the tool is running, with one exception: In the case where WHS2WHS is running directly on WHS V1, you must select the Option: “Force Target Paths to WHS 2011 Format”, on the Options Menu. This allows you to install WHS 2011 volumes on WHS V1 and high-speed copy data from WHS V1 shares.
Migration Steps:
These steps assume that a working, operational WHS 2011 system has been setup and tested. It must be stable, and should have been making regular system (C: drive) backups, with no errors, for at least a week. Optionally, clients can be attached and backups started. By the time the planning and data movement have been completed, you will then have one or more backups of your client computers. Again, this is optional. This can be done after the other data has been moved.
1. Plan the placement of folders on a set of drives / volumes that you will configure on WHS 2011. Keep in mind that in WHS 2011, the largest block of data that can be backed up is 2TB, whether it be a set of folders or a complete drive. Multiple backup locations can be defined, and other techniques may be employed to make periodic, incremental backups of server folders. WHS2WHS allows you define volumes, then drag and drop folders into the volumes. You can play around with various schemes until you are satisfied. Nothing is actually being moved – it is just a plan. You can print the plan to keep track of your progress, and you can even modify the plan as time goes on, if you change your mind. It is advisable to keep a plan that reflects the target scheme.
2. On the source WHS Server, organize existing folders to exactly match the planned set of target folders. Folder names should match, for easiest migration. However, if Beyond Compare is used, WHS2WHS pauses at the Beyond Compare dialogue, giving an opportunity to make adjustments (e.g. WHS V1 “Photos” needs to copied to WHS 2011 “Pictures”). If you have online backups, such as a secondary WHS server, verify that the data you intend to copy to WHS 2011 has been backed up, and is in sync with the latest backup copy. In my case, I discovered a number of inconsistencies that had accumulated over 2 years – probably due to power glitches or hard drive errors, and my mistakes in setting up RoboCopy scripts. I am clearing these up as I go through the data migration.
3. Manually, or using the assistance of WHS2WHS Pro, start copying data from the source WHS to the target WHS 2011. After confirming that the data has been copied and verified correct, using any method, you will then erase the old copy of the data. On the source WHS system, you must then “Remove” a drive that with then be available to add to the WHS 2011 system. If you have a large amount of data, and large folders, this will require a skillful manipulation, so that there is always enough space on the target to complete the planned copy process.
You should have backups of all data being copied, even if you have to do it step by step, reusing the a spare external drive. Backup, then copy, verify, then erase the old copy, then on to the next chuck of data. You can remove drives from the source WHS system as a result of turning off folder replication after first ensuring that those folders are backed up elsewhere. It will be a personal decision as to whether any data pruning should be done prior to the move. If you are like me, the is an increased opportunity for mistakes when so much is going. I plan to blindly copy all the data over, and after running stable for awhile, then start a cleanup process.
Alternate Migration Process
You might wonder why WHS2WHS has not been implemented as an Add-in. My feeling was the most important thing missing was a way to organize and plan. There are many options for actually copying / moving the data. So WHS2WHS is primarily a planning tool. The available Disk Management Add-In is the perfect companion to WHS2WHS for users that prefer an add-in approach. In the case, the steps would be:
1. Same as steps 1 and 2 above.
2. Install WHS 2011 formatted drives on WHS V1, with folders already prepared (DO NOT add them to the DE storage pool).
3. Using the Disk Management add-in, manually move or copy the appropriate data from WHS V1 shares to the WHS 2011 volume.
4. Re-install the WHS 2011 volume back into the WHS 2011 server, verify the results, then repeat for the remaining volume(s).
Basic Features of WHS2WHS
· Drag and drop folders from the source to the target.
· Drag and drop folders between disks on the source.
· Manual edit of volume / drive properties such as drive letter, volume name and free space (GB)
· Manual edit of folder path names and size (GB)
· Ability to create text notes for each volume, e.g.: “This volume is a RAID 5 of 4 – 2TB drives, yielding 6TB usable”. Use only for non-criticaldata.
· Automatic recalculation of free space as folders are moved around
· Optional automatic discovery of folders on the source WHS server (whenever server name is updated)
· Optional automatic discovery of volumes on target WHS 2011 server (context menu)
· Optional automatic discovery of servers in network (right click on group box)
· Ability to use multiple credentials for discovery: source user/PW, target user/PW and alternate user/PW
· Optional automatic discovery of folder sizes (slow for large folders)
· Double click opens a network share
· Built-in screen view. Print this view to use for notes on progress.
· Plan is saved and restored between sessions. The plan can also be reset.
Additional Features of WHS2WHS Pro:
Advanced users, consultants and corporations may find the functions of WHS2WHS Pro useful.
· Load / Save multiple migration plans, by name (XML format).
· View / Print Log for diagnostic purposes (e.g. failed copy operation.)
· Automatic invocation of Microsoft RichTools RichCopy (“RoboCopy” successor): this process starts immediately upon confirmation. Real-time copy progress is provided
· Automatic invocation of Beyond Compare data tool. After conformation, Beyond Compare displays its dialog, whereupon additional tweaking of filters and any operations can be performed manually prior to starting the actual copy. Real-time copy progress is provided.
· WHS2WHS looks for RichCopy and Beyond Compare where they are normally installed on 32 bit systems. If WHS2WHS does not find the programs automatically, there is a menu option for manually specifying the location of those programs. I have found both of these tools to be invaluable in managing my data. Beyond Compare, in particular, has an astounding number of ways to compare, copy, view and validate data.
· Ability to call a custom script as part of the copy process. Your script may be called from within the CustomCopy.bat windows batch file, located in the WHS2WHS installation folder. The following parameters are passed to CustomCopy.bat:
%1 = Source (WHSV1) Path (Folder being copied)
%2 = Source User Credential
%3 = Source PW Credential
%4 = Source Dns Hostname
%5 = Target Path (Destination Folder for files from Source Folder)
%6 = Target User Credential
%7 = Target PW Credential
%8 = Target Dns Hostname
%9 = Target (WHS2011) Drive
Windows Home Server Migration Assistant Pro is available for individual use at $15.95 whilst a consultants license is $49.95 and a enterprise license is $499.95
Share this WHS Article with Others:


