Windows Home Server Toolkit V1 Released
Available at Microsoft’s Download Center is the Windows Home Server Toolkit V1 which is three tools rolled into one install package which will help you troubleshoot issues with WHS.
The download comprises the following components:
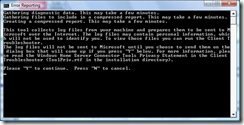
– Error Reporting
The Error Reporting command-line tool gathers diagnostic log files from your home computer and sends them to Microsoft in a compressed Dr Watson report. These log files are useful to Microsoft Support when troubleshooting problems which you may encounter with Windows Home Server.
After installation Error Reporting can be found in the Start Menu under Windows Home Server Toolkit.
– Windows Home Server Connector Troubleshooter
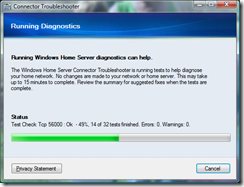
The Windows Home Server Connector Troubleshooter is a program that runs on your home computer to help troubleshoot problems you may encounter while installing the Connector software. The Connector Troubleshooter runs a series of tests to check the most common Connector Setup problems, and then recommends possible solutions.
When started from the Start menu, the Troubleshooter runs in “simple mode.” It runs tests and displays a summary of the results in a web page. It also provides suggestions to help you successfully install and configure the Connector software.
After installation the Windows Home Server Connector Troubleshooter can be found in the Start Menu under Windows Home Server Toolkit as the Connector Troubleshooter.
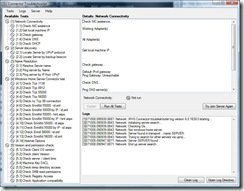
You can also start the Troubleshooter in “advanced mode.” Some of the functionality of the Troubleshooter is available only in advanced mode. To start the Troubleshooter in advanced mode:
1. In Windows Vista, Click Start, run and then type cmd in the open text box. In Windows XP, Click Start, run and then type cmd in the open text box.
A command-prompt window opens.
2. At the command prompt, type “cd %ProgramFiles%\Windows Home Server\Toolkit” (without the quotation marks) to change the current directory.
3. Type ConnectorTroubleshooter.exe -a to start the Troubleshooter.
The Troubleshooter starts and finds all of the home servers on your home network. To start the tests, click Run all tests. The Troubleshooter asks you to select a server that you want to test, and then you must provide a user name and the Windows Home Server password. If your home server is not in the list, you can type its name. Type Administrator for the server admin name, and then type the Windows Home Server password for the password. The Windows Home Server password is the password that you created during Windows Home Server Setup. If you never created a Windows Home Server password, leave the password blank.
– Windows Home Server Toolkit Add-in
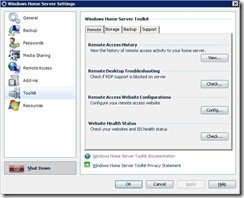
You can also install a Windows Home Server Toolkit Add-in on your home server. With this Add-in, you can run troubleshooting tasks from the Windows Home Server Console Settings page.
To install the Add-in on your home server, open the Windows Home Server Connector Troubleshooter in advanced mode (see above) then on the menu, click Server, and then click Publish Server Add-in. You are prompted for the name of your home server and for a user-account name and password. Either you can use your own Windows Home Server user-account name and password, or you can use the Administrator user account and password that you used when you ran the Troubleshooter tests.
The Add-in is now copied to the \\ServerName\software\add-ins shared folder. Use the Windows Home Server Console to install the Add-in from the Add-ins, Available tab.
You can use this Add-in to do the following:
· Send log files from Windows Home Server to Microsoft to investigate problems.
· Check the health of your server storage.
· Open a command prompt on your home server.
· Open Event Viewer.
· View the Windows Home Server log files.
· Change the trace levels for the log files to record more or less information.
· Change the settings for the backup-health notification.
· And more….
Share this WHS Article with Others:


This kit is nice! Especially when the add-in is installed on WHS. Access to log files right from the console! Pretty simple to install on your main pc then install on WHS. Thanks for the instructions, Philip!
Hi The Judge,
Some nice goodies available from within the console now.
Phillip or others,
Do you have to have RTM installed for this toolkit download to install in WHS? I downloaded the MSI file to the \\server\software\Ad-Ins directory but it does not show up in the install list. Maybe I did something wrong?
Hi George,
This piece of software has to be installed differently, just follow the instructions under – Windows Home Server Toolkit Add-in above.
George,
Yeah, I did a double take on this one too. But you install this on your client PC first. Then from the Start>Run type code above to activate the Advanced version of the tool kit. Then at the top of the kit window you will have an option to install on WHS. Once that is done you will find the Tool Kit add-in waiting in the list to install in the WHS console. Install and restart Console. Now you will see it in the list on the left side.
Like Philip said, follow along above and you’ll have it up in a few steps.
Phillip and Judge, Thank you both for your replys I am certain I will be able to figure this out and get it installed. Unfortantly I have a network error that is preventing me from installing the msi file on my client and don’t have the time to determin why at the moment but I will get the time probably tomorrow. I just wanted to acknowledge your assistance (both of you) and thank you for your reply. More when I have this figured out… 🙂
Hi George,
Thats no problem, let us know if you have any more problems.
I have installed WHSC onto my DELL PC. I can get as far as putting the pasword in, and then it shuts me out. I believe that is DNS related – I can access the server, and internet sites – but only by using IP addresses. The names are somehow not being resolved. I have done a considerable amount of tweaking to attempt to resolve this, but I am afraid that I am beginning to go round in circles…