Add-In: Home Server Status 2.01

The add-in Home Server Status has had an update for Windows Home Server 2011 users.

Version 2.01 has two changes:

  1. Internal clean-up
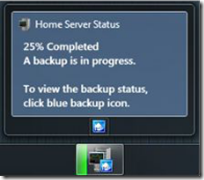
  2. Added progress to the system tray icon when a backup is running. This way someone can visually see their backup progress without having to hover. See screenshot below.

Home Server Status 2.01

Here is the download link for Windows 7 32bit/64bit: HSS v2.01

BYOB Podcast Episode 56

BYOB Logo

The latest episode of the BYOB podcast is available for download:

“Timekills returns with an update on SSD caching, Asus k53E review, Llano or i3 HTPC? Corsair Force GT SSD.”

You can find episode 56 here.

TwonkyServer 6.0.36

Version 6.0.36 of the media server software, TwonkyServer has been made available for WHS users.

Twonky T Logo

Here are the release details:

– This software update includes a new feature that allows you to wirelessly sync media from your mobile device to your computer. For more information about using this feature with our Twonky Mobile Android app, check out the “Syncing Your Files” section below.
– A new client adaptation was added for Sony Bravia, Sony Blu-Ray Home Theaters and Sony Blu-Ray Players. With this change, all files that could be played through other DLNA servers are now also supported by TwonkyServer.
– Fixed a problem with the web config page not launching that occurred when installing TwonkyServer on a Mac running the Lion OS.
– Fixed YouTube streaming problems
– Information about other improvements and bug fixes can be found in the TwonkyServer release notes, which can be found in the TwonkyServer folder under Program Files\Twonky.

Syncing Your Files

This software update includes a new feature that allows you to wirelessly sync media from your mobile device to your computer. This way, your home computer will always have the latest photos you’ve taken with your mobile device, or you can choose what files from your computer you want with you wherever you go. Set it to automatically sync whenever your devices are on the same Wi-Fi network, or perform a manual sync at your convenience. You can configure wireless syncing the first time you launch this software, or set it up later by following the steps below:

Configuring Sync Settings

In most cases, the factory defaults for the sync folders on your mobile device will work without any need for configuration.

By default, synced photos are found in the DCIM folder on your SD card. Synced music and videos are found in the Twonky Sync folder on your SD Card. To change the default sync folders on your mobile device, follow the steps below under ‘Changing Your Mobile Sync Folders.’

Selecting a Sync Server

Before you can sync your media, you need to install a compatible sync server on your computer and select this as your sync server. Compatible sync servers include: TwonkyServer 6.0.36 (or later), TwonkyManager 2.0.7 (or later) or other WebDAV server software.

1. Launch Twonky Mobile
2. Press the menu button and click on Sync.
3. Select ’Sync Settings’
4. Select ’Configure Music Sync’
5. Touch ’Choose sync location’ and select the remote server and folder you want to use for synching. You’ll see a spinning circle while we scan your network for supported servers. Make sure you’ve installed one of the compatible sync servers listed above.
6. Press the OK button to continue, unless you have previously set a username and password for this server. By default no username or password has been set.
7. By default, the type of syncing is set to copy server files to this device. To change this select one of the following three options:

a. Full sync – This syncs files in both directions. Files added to either sync folder, will be copied to the sync folder on your other device.
b. Copy files from this device to server – This only syncs in one direction, from this device to your other device.
c. Copy server files to this device – This only syncs in one direction, from the other device to this device.

To automatically sync all items, press the back button and check ’Allow Auto-Sync when in home network’ which is described below.

8. Press the Back button and repeat steps 5 through 8 for photos and video..
9. When you’re finished, press the Back button until you’ve returned to your media.

Note: The syncing feature is a non-deleting sync. This means that it will not delete the files on your server if you delete them on your device. Alternatively, if you delete or move files from your sync folders on your server, those files will not be deleted from your device the next time you sync.

Automatic Sync

If you’ve checked ’Allow Auto-Sync when in home network’ on the Sync Settings screen, your mobile device will automatically sync with the selected sync server every time your mobile device joins your Wi-Fi network.

Manual Sync

To manually sync media, go to the Menu page and press the Sync button. Then, press the Sync button for a desired media type.

You’ll see a progress bar appear. Keep in mind that it takes about 10 seconds to sync a song over Wi-Fi, so be patient if you’ve selected a folder with a lot of media.

To sync all media types at once, just click the Sync All button at the top.

Finding Synced Media

By default, you can find synced media on your mobile device here:

Music – Twonky Sync/Music
Photos – DCIM
Videos – Twonky Sync/Videos

By default, you can find synced media on your computer here:

Music – My Music\Twonky\Sync
Photos – My Pictures\Twonky\Sync
Videos – My Videos\Twonky\Sync

Changing Your Mobile Sync Folders

1. Press the menu button and click on Sync.
2. Select ‘Sync Settings’
3. Select ’Configure Music Sync’
4. Select ’Edit sync location’
5. Select a folder for each media type that you want to sync by clicking on it and pressing the Select button. Synched files will be placed here. It is not recommended that you select the top level (or root) of your SD card for this.
6. Repeat steps 4 through 6 for photos and video if you plan to sync them as well.

How This Feature Differs from TwonkyCopy

– Works with any type of file, not just media files
– Automatic sync offered in addition to manual copying of files
– Goes beyond file copying by keeping folders on different devices synchronized
– Syncs all media at once or by specific media type (e.g. music only)
– Ideal for backing up mobile photos and videos to a computer or NAS
– Syncs with a specific music folder on computer to avoid overloading mobile device
– Compatible with non-Twonky WebDAV servers
– Automatically launches and runs in the background as a separate application
– Automatically discovers sync-compatible TwonkyServer on a Wi-Fi network (no need to manually enter server IP address)


You can download from here.

Add-In: StableBit DrivePool Build 3785

Stablebit_drivepool_logo

Two updates for StableBit DrivePool over the last few days. First was build 3717 with the following changes:

  • Changed expiration policy to allow read access to the pool even if expired.
  • Set permissions directly on the pool, avoid auto-propagation.
  • Do not use thread pool to propagate permissions.
  • Fixed some critical errors that were shutting the service down unexpectedly.

Next is build 3785 which now allows you to put your backups on the pool, allowing you to backup as much as you want with no space limits:

  • Fixed rare but critical race condition in read / write I/O.`
  • Extended expiration by another 30 days (10/1/2011).
  • Do not consider error 6 as an I/O error.
  • Added the ability to move the computer client backup folder to the pool.
    Supports moving the folder to / from the pool, changing duplication and calculating folder size.
  • Fixed file deletion where if Windows decided not to delete a file after flagging it for deletion, the file was deleted anyway. This affected CD / DVD creation from files in the pool.

More details on StableBit DrivePool can be found here.

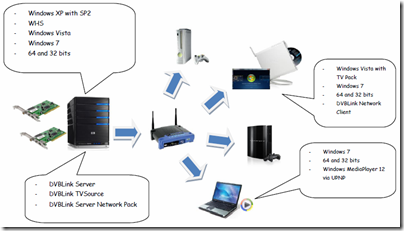
DVBLink v4 Beta 2 Expiration Period Extended

For DVBLink v4 beta 2 the guys have released a patch to extend the expiration period for another 30 days until beta 3 comes out in a weeks time.

DVBLink TV Source Networked Installation

The patches can be downloaded from the following links:

Please read the patch installation instructions carefully.

DVBLink TVSource

  1. Stop dvblink_server Windows service
  2. Navigate to DVBLink installation folder and unzip the contents of dvblink_tvsource_b2plus.zip into it preserving the directory structure and overwriting existing files.
  3. Manually copy helper.dll from <dvblink>\templates\sources\tvsource into each instance of TVSource source – <dvblink>\sources\<your tvsource sources> – overwriting the existing file
  4. Start dvblink_server Windows services, navigate to DVBLink configuration home page and check the expiration period of the product

DVBLink Home Server

  1. Stop dvblink_server Windows service
  2. Navigate to DVBLink installation folder and unzip the contents of dvblink_home_server_b2plus.zip into it preserving the directory structure and overwriting existing files.
  3. Start dvblink_server Windows services, navigate to DVBLink configuration home page and check the expiration period of the product

As always more information on DVBLink can be found here.

Add-In: Home Server Status 2.0 Minor Update

The add-in Home Server Status v2.0 has had a very small update.

Home Server Status Task Bar Backup Progress

Change log:

  • FIXED: Removed WHS v1 icons. Originally, I used very similar WHS v1 icons for nostalgia, but since I do not wish to break MS copyright, I have totally replaced the icons in the settings page and system tray with originals.
  • FIXED: When running the application for the first time, the message box would lose focus, and could not be regained restarting the application.

Windows 7 32/64bit Download Link: HSSv2.0

The Home Server Show Podcast Episode 149

home_server_show_small

Episode 149 of The Home Server Show UR1 Edition is available.

This weeks podcast has news and views from Dave and the guys on everything Home Server, including details on Update Rollup 1.

You can get it here.

Acer RevoCenter for WHS 2011 Closer to Release

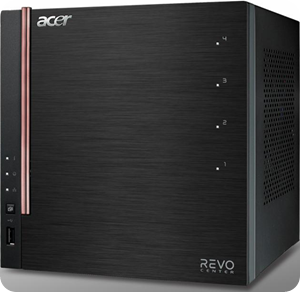
As announced earlier this year hardware from Acer for WHS 2011 in the form of the the RevoCenter is (finally) nearing release.

Acer RevoCenter RC110-RC111 Front View

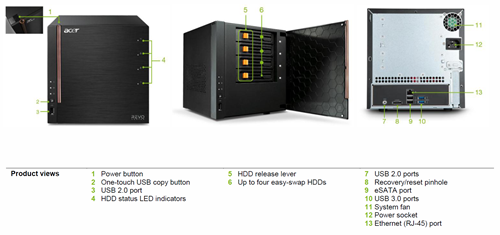
The Acer RevoCenter RC110 – RC111 looks similar to its v1 offering but naturally has beefier hardware. Sporting a Intel Atom D425 in the RC110 and a D525 Atom in the RC111, both units come equipped with the four 3.5" hot-swappable SATA bays which can be further expanded upon thanks to the 3x USB 2 ports, 2x USB 3 ports and the eSATA port.

Acer RevoCenter RC110-RC111 Product Views

The Windows Home Server Blog states that availability dates for global markets will be available soon

You can download the RevoCenter datasheet  and find out more about the RevoCenter from Acer.

Creating User Accounts on WHS 2011

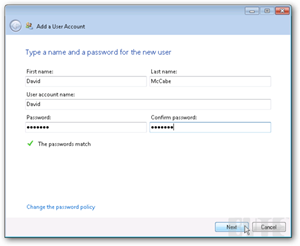
David McCabe has another article on BYTE on how to add users to Windows Home Server 2011.

Another great back to basics tutorial by David which takes us through creating user accounts and the options open to us along the configuration process.

Add a User Account on WHS 2011

You can read it here.

Will the HP ProLiant MicroServer Survive?

With HP’s news last week stating they are going to spin off or sell it’s Personal Systems Group (PSG), many of you have asked if this will affect you if you own the HP ProLiant MicroServer,  a great server to install Windows Home Server.

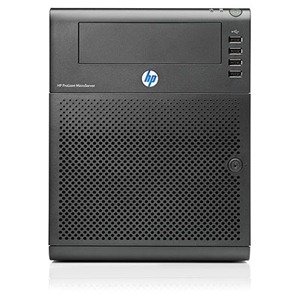
HP ProLiant MicroServer

And the good news is no it will not affect you ,as the MicroServer comes under the Enterprise Servers, Storage and Networking Group (ESSN) which is not affected by this announcement – Great News!