WHS Migration Assistant Pro 1.01

Mediadogg Software have just released Windows Home Server Migration Assistant Pro, a tool to help you in the planning of the data move from WHS v1 to WHS2011.

WHS2WHS

In addition to the planning functions, the WHS Migration Assistant (WHS2WHS) has functions for partially automating the actual data movements and other functions for saving, restoring and printing multiple plans. And although WHS2WHS Pro does not directly copy, erase nor move any data. It provides a planning template as well as a framework for invoking other tools, using the plan as a guide.

Here’s the details:

Method of Operation:

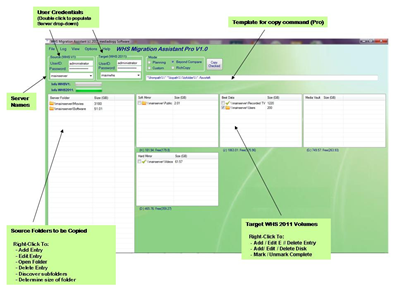
Think of the move operation as going from left to right. WHS2WHS presents a screen that shows the shared folders from the source WHS system on the left, and the Volumes (drives) associated with the WHS 2011 system on the right. This is due to the fact that WHS 2011 uses a different scheme for managing shared folders. Instead of locating folders on a large pool of data that Drive Extender maps onto multiple drives, WHS 2011 requires the administrator to allocate shared folders to logical disk volumes, which usually correspond directly to physical disk drives, but not necessarily. Technologies such as RAID can be used to create logical volumes with various reliability and performance attributes comprised of multiple physical drives. WHS 2011 works with the logical drives (or “volumes”).

WHS2WHS supports two basic scenarios for operation:

A. Both Source and Target folders are network shares (e.g. “\\SourceServer\Movies” and “\\TargetServer\Movies” )

B. Source folders are network shares and Target folders are WHS 2011 folder names on local volumes (e.g. “\\SourceServer\Movies” and “D:\\ServerFolders\Movies” )

WHS2WHS automatically formats path names to handle these scenarios, regardless of where the tool is running, with one exception: In the case where WHS2WHS is running directly on WHS V1, you must select the Option: “Force Target Paths to WHS 2011 Format”, on the Options Menu. This allows you to install WHS 2011 volumes on WHS V1 and high-speed copy data from WHS V1 shares.

Migration Steps:

These steps assume that a working, operational WHS 2011 system has been setup and tested. It must be stable, and should have been making regular system (C: drive) backups, with no errors, for at least a week. Optionally, clients can be attached and backups started. By the time the planning and data movement have been completed, you will then have one or more backups of your client computers. Again, this is optional. This can be done after the other data has been moved.

1. Plan the placement of folders on a set of drives / volumes that you will configure on WHS 2011. Keep in mind that in WHS 2011, the largest block of data that can be backed up is 2TB, whether it be a set of folders or a complete drive. Multiple backup locations can be defined, and other techniques may be employed to make periodic, incremental backups of server folders. WHS2WHS allows you define volumes, then drag and drop folders into the volumes. You can play around with various schemes until you are satisfied. Nothing is actually being moved – it is just a plan. You can print the plan to keep track of your progress, and you can even modify the plan as time goes on, if you change your mind. It is advisable to keep a plan that reflects the target scheme.

2. On the source WHS Server, organize existing folders to exactly match the planned set of target folders. Folder names should match, for easiest migration. However, if Beyond Compare is used, WHS2WHS pauses at the Beyond Compare dialogue, giving an opportunity to make adjustments (e.g. WHS V1 “Photos” needs to copied to WHS 2011 “Pictures”). If you have online backups, such as a secondary WHS server, verify that the data you intend to copy to WHS 2011 has been backed up, and is in sync with the latest backup copy. In my case, I discovered a number of inconsistencies that had accumulated over 2 years – probably due to power glitches or hard drive errors, and my mistakes in setting up RoboCopy scripts. I am clearing these up as I go through the data migration.

3. Manually, or using the assistance of WHS2WHS Pro, start copying data from the source WHS to the target WHS 2011. After confirming that the data has been copied and verified correct, using any method, you will then erase the old copy of the data. On the source WHS system, you must then “Remove” a drive that with then be available to add to the WHS 2011 system. If you have a large amount of data, and large folders, this will require a skillful manipulation, so that there is always enough space on the target to complete the planned copy process.

You should have backups of all data being copied, even if you have to do it step by step, reusing the a spare external drive. Backup, then copy, verify, then erase the old copy, then on to the next chuck of data. You can remove drives from the source WHS system as a result of turning off folder replication after first ensuring that those folders are backed up elsewhere. It will be a personal decision as to whether any data pruning should be done prior to the move. If you are like me, the is an increased opportunity for mistakes when so much is going. I plan to blindly copy all the data over, and after running stable for awhile, then start a cleanup process.

Alternate Migration Process

You might wonder why WHS2WHS has not been implemented as an Add-in. My feeling was the most important thing missing was a way to organize and plan. There are many options for actually copying / moving the data. So WHS2WHS is primarily a planning tool. The available Disk Management Add-In is the perfect companion to WHS2WHS for users that prefer an add-in approach. In the case, the steps would be:

1. Same as steps 1 and 2 above.

2. Install WHS 2011 formatted drives on WHS V1, with folders already prepared (DO NOT add them to the DE storage pool).

3. Using the Disk Management add-in, manually move or copy the appropriate data from WHS V1 shares to the WHS 2011 volume.

4. Re-install the WHS 2011 volume back into the WHS 2011 server, verify the results, then repeat for the remaining volume(s).

Basic Features of WHS2WHS

· Drag and drop folders from the source to the target.

· Drag and drop folders between disks on the source.

· Manual edit of volume / drive properties such as drive letter, volume name and free space (GB)

· Manual edit of folder path names and size (GB)

· Ability to create text notes for each volume, e.g.: “This volume is a RAID 5 of 4 – 2TB drives, yielding 6TB usable”. Use only for non-criticaldata.

· Automatic recalculation of free space as folders are moved around

· Optional automatic discovery of folders on the source WHS server (whenever server name is updated)

· Optional automatic discovery of volumes on target WHS 2011 server (context menu)

· Optional automatic discovery of servers in network (right click on group box)

· Ability to use multiple credentials for discovery: source user/PW, target user/PW and alternate user/PW

· Optional automatic discovery of folder sizes (slow for large folders)

· Double click opens a network share

· Built-in screen view. Print this view to use for notes on progress.

· Plan is saved and restored between sessions. The plan can also be reset.

Additional Features of WHS2WHS Pro:

Advanced users, consultants and corporations may find the functions of WHS2WHS Pro useful.

· Load / Save multiple migration plans, by name (XML format).

· View / Print Log for diagnostic purposes (e.g. failed copy operation.)

· Automatic invocation of Microsoft RichTools RichCopy (“RoboCopy” successor): this process starts immediately upon confirmation. Real-time copy progress is provided

· Automatic invocation of Beyond Compare data tool. After conformation, Beyond Compare displays its dialog, whereupon additional tweaking of filters and any operations can be performed manually prior to starting the actual copy. Real-time copy progress is provided.

· WHS2WHS looks for RichCopy and Beyond Compare where they are normally installed on 32 bit systems. If WHS2WHS does not find the programs automatically, there is a menu option for manually specifying the location of those programs. I have found both of these tools to be invaluable in managing my data. Beyond Compare, in particular, has an astounding number of ways to compare, copy, view and validate data.

· Ability to call a custom script as part of the copy process. Your script may be called from within the CustomCopy.bat windows batch file, located in the WHS2WHS installation folder. The following parameters are passed to CustomCopy.bat:

%1 = Source (WHSV1) Path (Folder being copied)

%2 = Source User Credential

%3 = Source PW Credential

%4 = Source Dns Hostname

%5 = Target Path (Destination Folder for files from Source Folder)

%6 = Target User Credential

%7 = Target PW Credential

%8 = Target Dns Hostname

%9 = Target (WHS2011) Drive

Windows Home Server Migration Assistant Pro is available for individual use at $15.95 whilst a consultants license is $49.95 and a enterprise license is $499.95
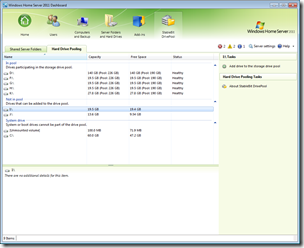
Add-In: StableBit DrivePool Build 1665

Build 1665 of StableBit DrivePool is available for Windows Home Server 2011.

Stablebit_drivepool_screen

This beta release of the Drive Extender replacement, includes the following changes:

  • Expiration updated.
  • Drive removal now takes priority over open handles. This means that if a file is open with no proper share access, that file will be force closed if the drive removal task needs to work on it. This is contrary to the old behavior of the drive removal task being safely aborted.
  • Read-only files on duplicated shares would prevent drive removal. Not any more.
  • When there is any kind of I/O error during drive related tasks (e.g. Drive removal), display the file path causing it.

More information is available from here.

Add-In: Diskeeper 2011 HomeServer Build 956

Another update to Diskeeper 2011 HomeServer the defrag tool for Windows Home Server users.

Diskeeper 2011

Fixes:

  • Fixed an incorrect warning in the Performance Report. If a volume is smaller than 2GB (e.g. a recovery partition), on which IntelliWrite may not be enabled, this is not flagged in the Performance Report as not optimal configuration.

New Features:

  • Added date, time, and product version to the saved and printed Job Reports.
  • IntelliWrite, if you have licensed HyperFast, can now be enabled on SSD-backed volumes (note the default setting is "off").

More details on Diskeeper 2011 HomeServer are available from here.

Add-In: Remote Notification 1.5.1.2 Supports Mac

The Add-in Remote Notification which enables you to keep up to date on the status of your Home Server no matter where you are,  has had an update.

Version 1.5.1.2 includes a number of new features plus minor bug fixes, including:

The biggest new feature is a Mac Connector application that offers Windows Home Server Health Alerts on your Mac desktop as well as reporting of Time Machine backup status to your Windows Home Server for centralized reporting and alerting. The current backup status of all Macs that are running Remote Notification is also included in the Daily Email Reports.

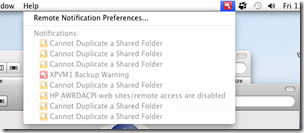
Mac-Connector-Health-Alerts

Windows Home Server health alerts can  now be displayed on your Mac desktop.

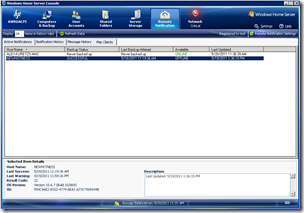
Remote-Notification-Mac-console-tab

The new Mac Clients tab allows you to monitor the backup status of your Macs from your Home Server Console.

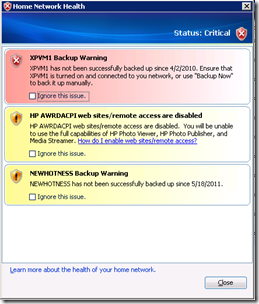
Mac-Backup-Health-Alert

A Mac that hasn’t been backed up recently.

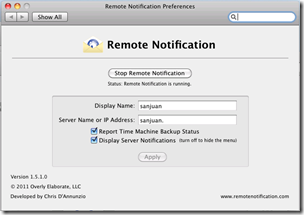
Mac-Connector-Preferences

Simple configuration via preferences pane.

Here is the full change log for version 15.1.2:

  • Feature: Mac application displays WHS Health Alerts on the Mac Desktop via a menu item
  • Feature: Mac application reports Time Machine backup status to the server for monitoring and alerting
  • Feature: Mac Client status is displayed in the Daily Reports if you have any Macs configured
  • Feature: More details in short message formats (Twitter and SMS), fully utilizing them to their max length when possible
  • Feature: Added “Create Debug File” button to Advanced settings tab to facilitate easier support
  • Bug: Windows Updates times in Daily Reports now correctly reported in Local time rather than UTC time
  • Bug: Recipient Add/Edit dialog updated to properly enable the Save button when settings are changed
  • Bug: Don’t allow Twitter recipients to change their Recipient Type, must delete and add new Recipient instead

More details on all these features are available here.

Drive Bender – Home Edition $20 for Beta Testers

Drive Bender Logo

Drive Bender have been in touch with details on what they are calling Drive Bender – Home Edition:

…we have set down a "pre-release" offer for everyone involved in the beta program.

Announcing Drive Bender – Home Edition. Home Edition will be a single license that supports a single pool, containing any number of drives.

For our devoted and dedicated beta testers, we will be offering a "pre-release", heavily discounted version of Drive Bender Home Edition for $20 USD. This pricing will be available to all current members, and those that register prior to the beta cut-off date (mid-June). The pre-release sale will start in June and finish two weeks after the final release.

$20 is a great deal, so if you haven’t registered already and would like Drive Bender at this special price then you can register here.

Ask Matt: your questions answered

Ask a Question

Mailbag 24th May 2011

Have a question or problem?
I can’t guarantee an answer, but I’ll try. Click “
ask a question” above!

Lenovo D400 Won’t Boot

Abe Asks:

My WHS (a Lenovo D400) ’falls off’ the network after about 30 minutes of uptime. After a restart by using the power button, everything seems fine for about 30 minutes, and then it falls off again.

The server will still be on, with all status LED’s nominal, but the WHS is not visible on the network, and all shares are unavailable.

WHS has Auto-updating on, and states no new updates are available. Only add-ins is Avast Anti-Virus for WHS, and Webguide Media Server.

This is a new issue in the past 45 days, and I’m stumped on troubleshooting, as I can’t seem to find any anomaly. Suggestions on where to troubleshoot would be appreciated.

First thing you need to remote in to the server, restart the server and then remotely access via “Remote Desktop Connection” this way you will get a full 30min to diagnose. Then head to start >> control panel >> administrative tools >> event viewer. Here you should get some idea of what is causing the problem, there should be a warning or error that indicates what the problem maybe. If you find nothing there to indicate any issue then I would look more towards the software that maybe installed on the server, try to remember if there was a piece of software or addin you install around the time this problem started to occur.

Also worth a look is any network equipment you may have plugged into the server, if you are using a managed switch then this could be the cause, if the network card in the server is causing the problem a managed switch will identify it and isolate it from the network, essentially cutting it off from all incoming and outgoing network traffic.

I am afraid without any further diagnostics it is difficult to know exactly what the cause maybe, but that should give you a basis to diagnose the fault.

How to assign a static IP to WHS

Matt Asks:

I’m struggling to work out how to assign a static IP to a Home Server running Windows 2008 Foundation R2 (x64 bit – I know it is overkill for home) – I cannot work out how to assign a single static IP so I can access…thanks!

In order to assign a static IP there are 3 ways this can be achieved:

  1. Remote into the server via Remote Desktop Connection (if possible) then go to >> Start >> Control Panel >> Network & Sharing Centre >> Click Change Adapter Settings in the top left corner >> Right click the LAN you want to setup a static IP address for and select properties >> Double click Internet Protocol Version 4 (TCP/IPv4). You will then be able to assign a static IP by filling in the relevant fields.

I know I haven’t been able to answer everyone’s questions, so those that haven’t been answered why not post them in the forum.

Have a question or problem?
I can’t guarantee an answer, but I’ll try. Click “
ask a question” above!

Written by
Matthew Glover
www.matthewglover.co.uk

Follow glovario on Twitter

Should I Use WHS2011?

Windows Home Server 2011

If you are still not sure about buying or upgrading to Windows Home Server 2011, then here is some inspiration for you, from WHS users, IT professionals and enthusiasts courtesy of Twitter:

From Sean Daniel (@seandaniel):

…Yeah, I love the #SetAndForget config of #WHS11 backup. Piece of mind for sure.

Jason Coombes (@databasejase):

Finished setting up Windows Home Server 2011 on the HP ProLiant MicroServer. It was a completely pain free experience. 🙂 #Vail #WHS

Tim Barrett (@timbarrett):

Investigate: Why is the Windows Home Server backup failing on one PC. Answer: Because the user keeps canceling it manually. (facepalm)

Tom Ziegmann (@tziegmann):

As someone who was disappointed with MS for the DE removal, I can safely say after using #whs 2011 RTM, the benefits outweigh the negatives.

Give WHS2011 a try, and with three Drive Extender (DE) add-ins in the pipeline you will not be disappointed!

The LaCie 5big Storage Server

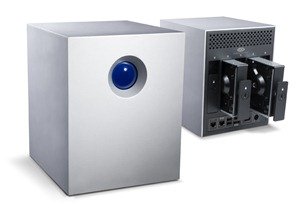
LaCie are now offering their 5big Server with Windows Storage Server 2008 which was formally known as Breckenridge, a close cousin to WHS2011. Known as the 5big Storage Server, its being touted as a professional file-sharing appliance for small and medium businesses.

5big Storage Server Front

Available in 3 hard drive configurations 1TB, 5TB and 10TB costing $1,199, $1,599, and $1,999, respectively and the 5big Storage Server comes with RAID 0, 1, 5,or JBOB modes for data reliability,

The unit is powered via a 64-bit dual-core hyper threaded 1.6Ghz Intel Atom processor has 2GB of DDR2-667 SODimm memory and has dual gigabit Ethernet links for link aggregation, delivering up to 180MB/s– for fast file transfers and system restoration.

With these features the 5big Storage Server is up to twenty percent faster than traditional NAS solutions and thanks to Microsoft’s Single Instance Storage (SIS), the 5big Storage Server will provide file-level duplication, so duplicate files will only be stored once, saving up to 40% space.

Other features include:

  • Microsoft’s DFS-R technology, allowing corporate administrators to complete an offsite backup of their critical data. NAS-to-NAS replication performances on the 5big Storage Server go up to 112MB/s. The DFS-R technology can also be used as a simple tool for offsite backups.
  • Mac compatibility: The 5big Storage Server will work in heterogeneous environments. PC and Mac users will be able to work and collaborate on the same storage unit. Thanks to fast AFP performances, the 5big Storage Server can complete a 320GB Time Machine® backup in just 2 hours.
  • Fast server backups: Back up the 5big Storage Server to eSATA hard drive attached. Back up 10GB to the external hard drive in a minute, or a 1TB 5big Storage Server in just two hours.

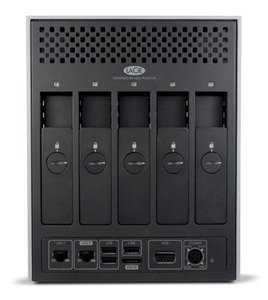
5big Storage Server Back

The 5 bay hot-swappable 5big Storage Server comes with 3 x USB 2.0 ports, 1 x eSATA port, 2 x Gigabit Ethernet 10/100/1000 Base-TX ports and 1 x VGA port.

More information is available on the 5big Storage Server here.

BYOB Podcast Episode 44

BYOB Logo

Episode 44 of BYOB is up, and this week Mike discusses some recent issues with his Windows Home Server stuttering during video playback and also provides details on his OCZ Vertex 3 SSD having an issue with Intel’s Rapid Storage Driver.

All this plus lots more in episode 44.

Add-In: Diskeeper 2011 HomeServer Build 954

Diskeeper 2011 HomeServer has had an update.

Diskeeper 2011

Build 954 includes the following changes:

Fixes:

  • Fixed an incorrect warning in the Performance Report. If a volume is smaller than 2GB (e.g. a recovery partition), on which IntelliWrite may not be enabled, this is not flagged in the Performance Report as not optimal configuration.

New Features:

  • Added date, time, and product version to the saved and printed Job Reports.
  • IntelliWrite, if you have licensed HyperFast, can now be enabled on SSD-backed volumes (note the default setting is "off").

More details on Diskeeper 2011 HomeServer are available from here.