By
Philip Churchill on December 17th, 2013
This is the fifth article of this series on using the Personal Online Storage Host (POSH). Previous articles provided an overview of the Personal Online Storage Host service, Archive Manager backup software, Explorer file-sync add-in as well as configuring your server for web hosting. This article assumes you have your server configured for web hosting and the POSH host setup.
This article describes setup and configuration of the Personal File Sync client software on a Windows-based PC to enable private file synchronization between two or more PC’s using your POSH server. This feature is similar to the Dropbox and Sugarsync services except your data is kept private; hosted and staged by your own personal server without the use of any third party hosting. For maximum security and privacy, all data is encrypted with AES 256-bit encryption on the source PC before being transmitted over the internet and is only decrypted once the data arrives at the target PC. All data remains encrypted even when stored on your privately hosted POSH server.

The Personal File Sync client is software which integrates directly into the Windows Explorer. A new volume named “personal file sync” will be located in the root of Windows Explorer. All files and folders in this volume will automatically be synchronized across all of the devices in your file sync group as created on the POSH host. The software supports virtually all Windows-based operating systems. You can install a copy of Personal File Sync on as many PC’s as you have user-seats available for your Personal Online Storage Server (POSH). The File Sync software connects each client PC to your host POSH server allowing each client to synchronize their files easily and securely through your personal server. File data is always secured with 256-bit AES encryption. Files are encrypted on the client PC before entering the internet, remain encrypted when stored on your personal POSH server, and only decrypted on the target client PC after being downloaded over the internet from the POSH server.
Personal File Sync supports virtually every Microsoft Server and Desktop operating system currently on the market.
· Windows Server 2012, 2008
· Windows Home Server 2011
· Windows Small Business Server 2011 Essentials
· Windows XP, Vista, 7, 8
· Microsoft .NET 4.0
Installation of the Personal File Sync client software on your Windows-based system is a simple wizard-guided process. The Personal File Sync client is a simple Windows Explorer add-in allowing you to synchronize a group of files and folders across multiple devices. You can find additional details about configuring and using the client on the product website as well as the support blog
Locate the installation package named PersonalFileSyncForWindows.exe. Double-click the file to launch the installation wizard. Note you can download the installation package for free from the website.

Figure 1 – File Sync Client download package
The installation wizard will automatically evaluate the system and gather requirements

Figure 2 – File Sync Client license agreement
Select a location to install the Personal File Sync client software and click Next

Figure 3 – File Sync Client install folder
At this point, the installation wizard has enough information to install the Personal File Sync client software. Click Next to begin the installation. If any missing dependencies are detected, such as the Microsoft .NET 4.0 Framework, you will be prompted and provided a URL to download the dependences from the Microsoft website.

Figure 4 – File Sync Client information gathered and ready
The installation proceeds

Figure 5 – File Sync Client installation progress
You are notified once installation is complete. Press the Close button to finalize the process. The Personal File Sync client software will automatically launch after installation is complete. If the software does not automatically launch then you can launch it manually from the Windows Start menu.

Figure 6 – File Sync Client installation complete
One first run you will be prompted to connect to the POSH server. You should have the device configuration file, username, and access code available. This information will be provided to you by the administrator of the POSH server.

Figure 7 – File Sync Client device verification
The Online Device Verification dialog prompts for the clients POSH account authentication details. Enter each value and press Verify to continue.
· Device configuration file – this file will be provided by the administrator of the POSH server. The administrator will provide you the file in one of two forms:
o A file of the form username_id.cfg
o A URL of the form http://www.awebsite.com/ username_id.cfg
· Filename/Url – depending if you are using a file or a url to locate the Device Configuration File (.cfg) this will be either:
o The full path to a .cfg file stored on your local system
o A URL pointing to a web server to download the .cfg file
· Username – this is an alphanumeric value provided to you by the administrator of the POSH server. This friendly identification will uniquely identify you
· Access code – this is a numeric value provided to you by the administrator of the POSH server. This is a temporary value allowing you to create your own personal password. Once the account has been verified and activated the access code is no longer valid. The user created password will be used for all future authentication
· Password – enter a unique personal password of your choice. Save this password in case you ever need to re-authenticate the Archive Manager software. This password will be encrypted and hashed for your protection at all times
· Verify Password – re-enter the same unique personal password for verification purposes
You will be notified when the software has been activated and connected to the POSH server. If activation fails then verify your entry matches the information the administrator of the POSH server provided to you and re-try. If activation still fails then contact the administrator and verify your account is enabled and the POSH server is currently online

Figure 8 – File Sync Client verification complete
The software configuration is complete. Click the OK button and the Personal File Sync client’s main window is displayed

Figure 9 – File Sync Client main screen
The main screen provides status and information about the state of the software and file synchronization.
· Status – press the Status button to view this status page
· Options – press the Options button to view the options and features page
· History view – the main list view displays information about the software such as startup time, shutdown time, conflicted files, and whether the product is paused
· Clear All Items – clears all the history events from the history view
· Clear Selected Items – clear only the currently selected items from the history view
· Copy To Clipboard – copy all or the history event items to the Windows clipboard to save into other Windows applications
· Task bar – located at the bottom of the main window; displays the most recently synchronized file name and date
The Options page provides features allowing you to customize the software as well as deal with potential file conflicts
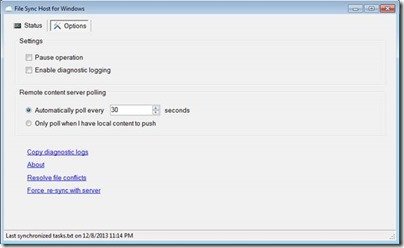
Figure 10- File Sync client options page
The options available are:
· Pause/Resume Operation – pause all synchronization operations. This feature can be used if you want to temporarily disable new files from being downloaded and uploaded to/from your PC. Once operation is resumed, all files that were synchronized to the POSH server from other users in your sync group will be downloaded to your PC
· Enable Diagnostic Logging – when directed by support personnel this option will gather diagnostic information for tracking and locating bugs in the software
· Remote Content Server Polling – specify how often you want your PC to query the POSH server for new files to be downloaded and synchronized on your PC.
· Copy Diagnostic Logs – when directed by support personnel this option will copy the current diagnostic information to a file on your desktop; useful to email support personnel
· About – view the version of the software
· Resolve File Conflicts – view a list of files which have not been able to be synchronized to/from the POSH server; probably due to busy/locked files. Here you can locate and fix busy files as well as elect to ignore selected files from being synchronized
· Force Re-sync with server – force a query of all files on the POSH server and automatically synchronize any files not currently on your system. This option should only be used if you believe a file was not synchronized down to your PC (a very rare case).
When you close the Personal File Sync client main window it still runs in the background waiting for new and changed files to synchronize to/from your PC and the POSH server. You can easily re-open the main window to view status by clicking on the task bar

Figure 11 – File Sync Client in the task bar
The Personal File Sync client integrates directly into Windows Explorer. A new system folder named “Personal File Sync” will be created at the root of the Explorer. All files and folders within this volume will be synchronized to all devices in your synchronization group. You can also access this synchronization folder directly in the Windows Public User’s share (e.g. Users\Public\Personal File Sync).
