Personal Online Backup Host (OBH) – Part 3
Installing and configuring the OBH client
Previous articles in this series provided an overview of the OBH service, Archive Manager backup software, Explorer file-sync add-in as well as configuring your server for web hosting. This article assumes you have your server configured for web hosting. If you do hot have web hosting configured then please read article two.
This article will focus on installing and configuring the OBH web host on your Windows-based server (or desktop PC with IIS installed).
OBH installation
The OBH client comes in two flavors:
- stand-alone Windows application (which runs on any 64-bit version of Windows operating system)
- WSS dashboard integration (WSS Dashboard: i.e. WHS 2011 and Windows Server 2012 Essentials).
The stand-alone version is downloadable as OnlineBackupHostForWindows.msi. The WSS dashboard version is downloadable as Obh.wssx. Both versions are available to download from the electrongoo website as a feature a fully-functional 60-day free trial.
The remainder of this article will focus on a walk-through with screen-shots taken from OBH running on Server 2012 Essentials. The OBH client is identical in feature and form regardless of your target operating system with the exception of the installation wizard.
Installing OBH
Download the installation package from the website. I’ve downloaded the WSSX package since I am running Windows Server 2012 Essentials and prefer integrated dashboard support.
I download the WSSX package to the Windows Desktop for easy access
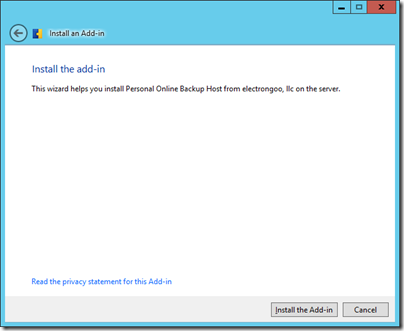
Double-click the obh.wssx installation package to launch the Windows Server Solution (WSS) installation wizard
The WSS wizard validates the install package to ensure it has not been tampered with and prompts you to begin the installation process
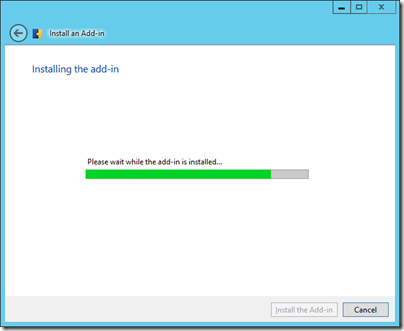
Installation is fairly quick; usually completing within 10 seconds
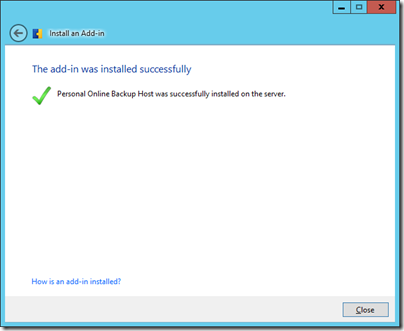
Once the install wizard has completed, press Close to complete the initial file copy and registration process.
Before you launch the Dashboard for the first time, you must copy the OBH website and configure the new application pool. This one-time process allows you to communicate directly to your server so you can store and sync files remotely.
Copying the web site files
First, you will need to find the location of the default website on your server:
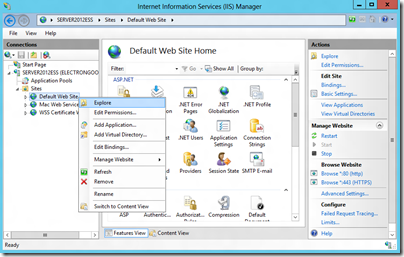
- Open Internet Information Service (IIS) Manager
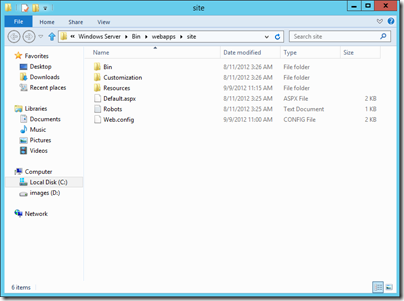
- In the Connections pane (on the left-hand side) drill-down to Default Web site, right-click and select Explore
- An explorer window will open to the root of your website. This is the location where you need to copy the OBH web files
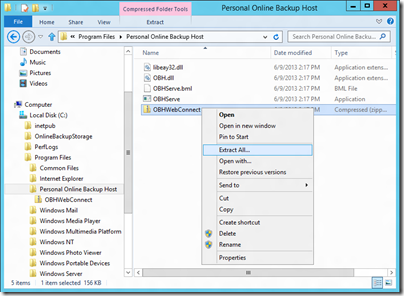
- Now, open an explorer window to the OBH installation folder (by default this is located in the folder “C:\Program Files\Personal Online Backup Host”) where you will see a zip file named OBHWebConnect.zip.
- Unzip the OBHWebConnect zip file by right-clicking and select Extract All…
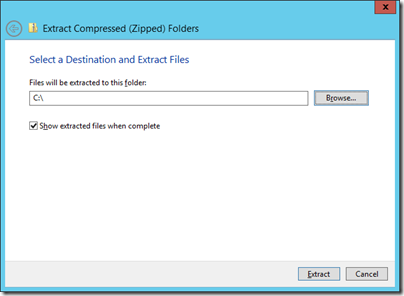
- Select a temporary destination to extract the files (I recommend using a temporary destination folder since you might not have access to un-zip directly to the folder containing your website). I selected the folder “C:\” for simplicity
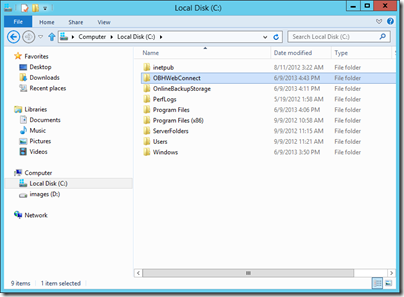
- The OBH web files will be extracted to a temporary folder named OBHWebConnect. Open an explorer window to the location where the files were extracted
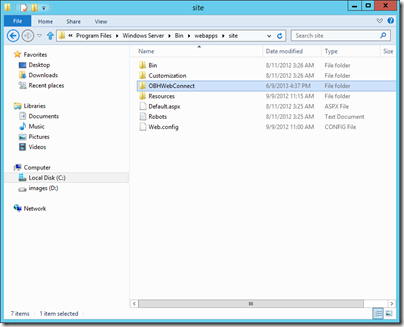
- Now move the OBHWebConnect folder to the root of your website. You can do this by holding down the shift key while you drag-and-drop the OBHWebConnect folder to the other explorer window containing the root of your website. Holding the shift key will move, instead of copy, the files from the original temporary folder
- Note, the final folder structure must have a folder named OBHWebConnect located directly under the root of your website as shown below
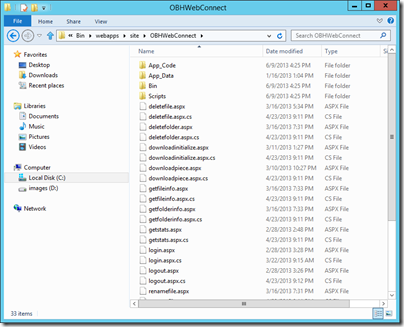
- If you explore into the OBHWebConnect folder then you should see all of the .aspx files which comprise the OBH web site
- Congratulations. The web site files are now in place. Now you need to create an application pool and set the associated rights for the web site
Creating an application pool
Now that the web site files are on the server you must create and assign an application pool to the OBH service.
- Return to the IIS Manager
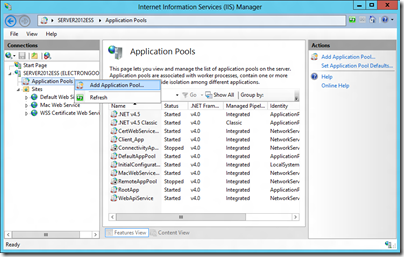
- In the Connections pane on the left-hand side, open your server, right-click and select Add Application Pool…
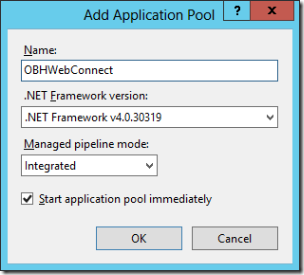
- Enter the name: OBHWebConnect
- Select .NET Framework version: v4.0.30319
- Set Managed pipeline mode: Integrated
- Leave “Start application pool immediately” checked
- Press OK to dismiss the dialog
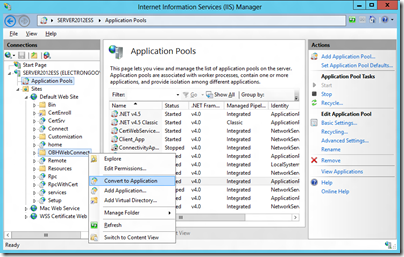
- Drill-down into your main site, right-click on the OBHWebConnect folder, and select Convert to Application
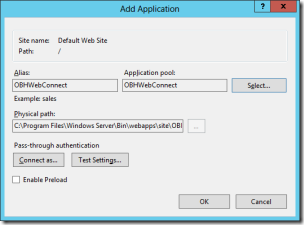
- Press the Select button and select OBHWebConnect
- Press the OK to dismiss the Add Application dialog
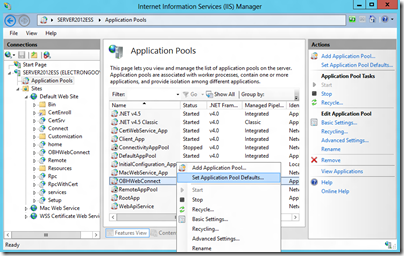
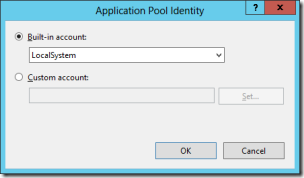
- From the Connections pane on the left-hand side, click on Application Pools, right-click on OBHWebConnect, and select Set Application Pool Defaults …
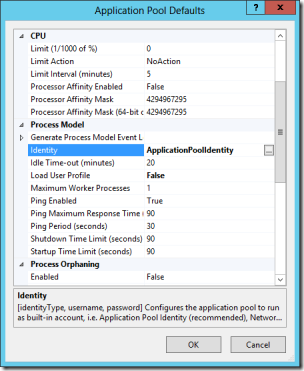
- Select Identity located under the Process Model group
- Click the … (ellipsis) button to edit the Identity setting
- Select the Built-in Account radio button
- And select Local System
- Press OK to exit the Application Pool Identity dialog
- You can close the ISS Manager
- Congratulations! A new OBH application pool has been created and you are ready to run the OBH client application
Verify the OBH web service
Now that the one-time OBH web-site configuration is complete you can verify the site is active.
- Open a web-browser directly on your server
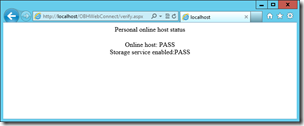
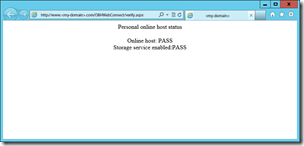
- Enter the URL http://localhost/OBHWebConnect/verify.aspx (the URL is case-sensitive!)
- You should see a web page load showing the host and storage service status have passed validation
Running the OBH client
Now that all the back-end server and web requirements are complete, you can launch the OBH client and begin creating users to access your server storage.
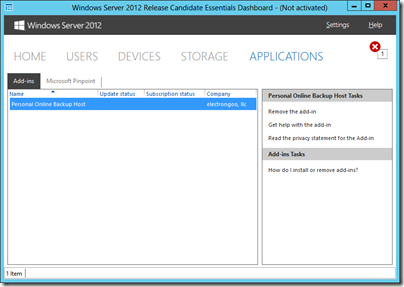
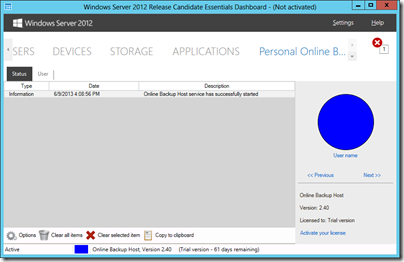
- Open the WSS Dashboard (alternately, if you are running the stand-alone version of OBH client then select Start | Personal Online Backup Host)
- The Personal Online Backup Host will now be visible under the Add-ins tab
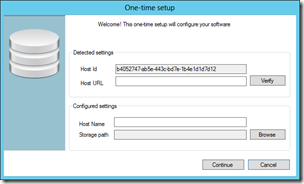
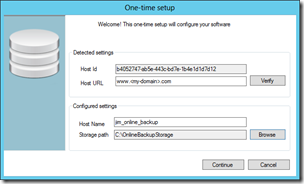
- Select the Personal Online Backup Host tab from the main tab bar and a dialog will prompt for a one-time initialization
- The host-id field will always be pre-filled. This value will uniquely identify your OBH service. Don’t worry, you will never be required to remember this identifier J
- The Host URL is the domain name of your server. This is the domain name you configured to point to your global IP address in article two of this series. You must enter this value.
- The Host Name is a user friendly name of your choosing. This will be visible to you as well as all users you allow to access your server’s storage so select something nice!
- The Server Storage path specifies the root folder where you want to store all data uploaded to your server. This is a default location but you can always over-ride the setting for each user that you create
- After you have propagated each of the settings, press the Verify key to the right of the Host URL to verify your domain name is setup correctly. If it is configured correctly then you will see an explorer window open showing the host and storage service are active
- Finally, click the Continue button to finalize the one-time initialization process
Congratulations! The one-time OBH client initialization is complete. You can now create users and give them access to your storage server.
Creating a user
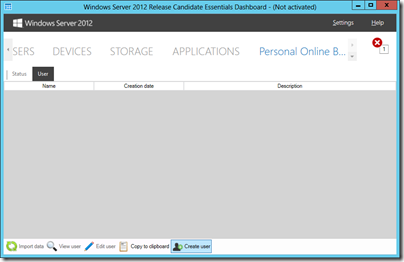
Creating a new user is a simple process using the OBH client. Select the Users tab located in the upper-left then press the Create User button located in the lower-middle
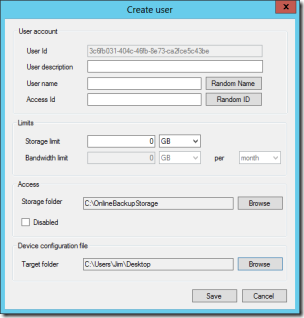
This will display a Create User dialog which allows you to define a user’s name, description, and any storage limits you want to impose.
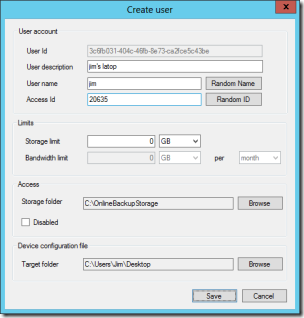
The following values define a user:
- User Id: this value is pre-filled for you. It uniquely identifies this user. You will never be required to recall this value
- User Description: a friendly description so you can identify the user. This value will be displayed in the OBH client for your reference
- User Name: the name of the user. This value will be given to, and seen by, the user when they install and activate the Archive Manager or Explorer file sync software
- Access Id: this is a temporary numeric value given to the user so they can unlock their account. The value is a one-shot value; meaning once they unlock their account with the access id and create a personal password then the access id becomes invalid
- Storage limit: the maximum amount of data the user can store on your server
- Bandwidth limit: the maximum amount of data the user can upload to your server over a period of time. *Note, this feature will be available in a future release of the software
- Storage folder: the folder on your server to store the users uploaded data
- Device configuration folder: the folder where the generated Device Configuration File will be stored. You will provide this file to the user along with their username and access id to unlock access to your server
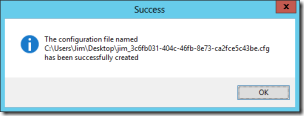
After you’ve filled –in all the fields, press the Save button to create the Device Configuration File
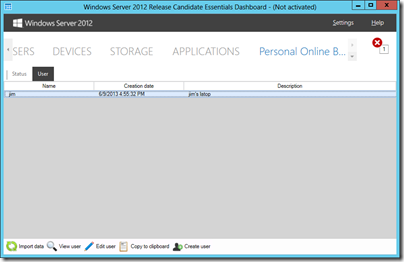
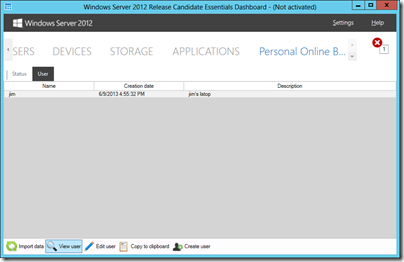
Press the OK button to dismiss the notification dialog and you will see the User list now contains your first user
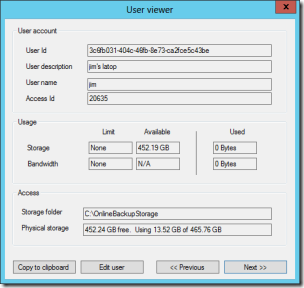
You can edit, view, or delete users at any time by selecting the View User button in the lower-left of the User tab
You can view the user’s current storage and bandwidth usage. Also, you can view the underlying physical storage of the device used to hold the users data. As in this example, this user’s storage is located on drive C: and there is a maximum of 452 GB of total space available. If you configured user with a hard-limit storage value then this value will be noted as well.
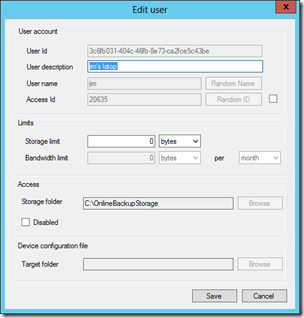
If you wish to edit the user then click the Edit User button. Here you can update limits for their storage and bandwidth usage. Also, you can create a new Access Id for a user by simply clicking the box to the right of the Random ID button. Creating a new Access Id would only be necessary if a user forgot their personal password and needs to re-attach to your server. Note, once you create a new Access Id for a user, they will not be able to log into your server until they reset their account on their PC with the new Access Id provide by you and they create a new personal password.
Now that you’ve created user account, you must provide the account information to the user so they can attach the Archive Manager software or Explorer file sync add-in to your storage server. You will need to provide the following information to the user:
- Device Configuration file
- Username
- Access Id
- A copy of the Archive Manager software or Explorer file sync add-in
Note, for security purposes it is best not to send the above items all at once over the same medium. For example, do not attach the Device Configuration file and software to an email containing the username and access id. The user account is available to be unlocked by anyone if they have all the information above; it is best to provide one of the items above (such as username or access id) directly in-person or over a phone line.
The above information is time limited. Once the user account is activated then the Access Id is no longer valid and access to your storage server requires the user’s personal password they created during initial configuration.
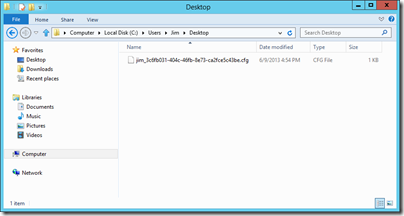
You will find the Device Configuration file located in the folder you specified when you created the user.
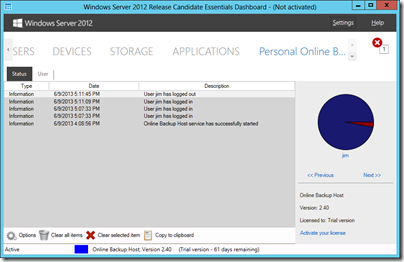
After you provide the user their account information and the configure their account (details for this setup will be available in article four of this series) you can view access the user makes to your server by selecting the Status tab
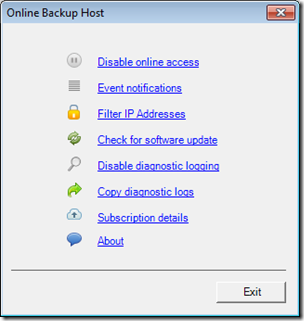
You can limit the types of notifications by selecting the Options button in the lower-left
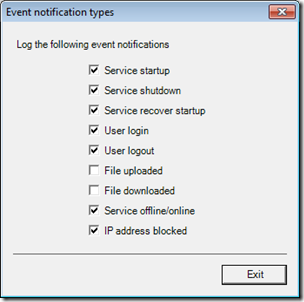
Followed by clicking Event Notifications
Select the notifications you wish to view in the status area. The File Upload and File Download options could fill the status area quickly so use those options wisely. The status area will automatically purge old notifications after more than 1000 entries are added
Wrap up
This covers installation and basic configuration of the OBH client and host. The next article will show how to install and configure the Archive Manager software so your users can backup and restore files directly to your server. Article five will re-visit the OBH client and get into more details for advanced configuration, security, and user management.

