Personal Online Backup Host (OBH) – Part 2
This second article
The first part of this article series provided a high-level overview of the Personal Online Backup Host service and its supporting technologies (Archive Manager and the Explorer add-in). Hopefully it also provided ideas on how the service can work for you at home or in your small business. This second article will focus on configuring your server for web hosting on the internet.
The OBH service is not for the typical computer end-user. While it does include easy to read documentation and simple one-click setup installer packages, there is a bit of “digging in” to configure your Windows operating system based web server and Internet Information Services (IIS). This setup is not too difficult but it does require a small amount of technical savvy, motivation, and attentiveness to detail.
The good news is that if your server is already enabled for internet web hosting then you can skip this article and jump directly to article three. How can you tell if your server is already enabled for web hosting? The simple answer: if you can access a web page on your server from an internet browser from a computer outside of your local network using a uniform resource locator (URL) such as www.<my-domain>.com then your server is already configured for web access.
Hosting you own web server
There are many different configurations you can use to host your own web server. The specifics of each configuration differ based on the router, version of Windows server, ISP, and domain host you are using. This article will provide a few links to existing articles describing different methods of setup. This article will focus on configuration Windows Home Server 2011, a D-link WBR-2310 (yes, it’s ancient but it still runs well), and a domain hosting solution by 1and1.com. If you are running a different Windows operating system, a different router, or using a different domain hosting solution (such as godaddy.com or MS Azure) then don’t worry they are compatible but you will probably run into slightly different interfaces and naming conventions then you’ll see in this article. If you have questions then contact your provider; they are there to help get you online!
If you have a home server or a micro-business then you might not have a domain name configured to point to your server. Here are a couple of free, and fairly simple, solutions for you:
· Use the free Microsoft @homeserver.com solution. As part of your MS Live account, you can configure an address of the form <my_server>.homeserver.com. This older write-up focusing on WHS V1 details the process. http://www.howtogeek.com/howto/14123/setup-remote-access-in-windows-home-server/
· Use a Dynamic DNS solution. Many home and small business routers support dynamic DNS (aka DynDNS) solutions directly in hardware. This service will allow you to point a domain name to your router and automatically handle cases where your home IP address changes. There are many DynDNS services available. Check your router for versions included in the hardware as those will be your best-bet. You can also Google the term “dyndns.”
· Purchase a basic web hosting package from a host provider such as godaddy.com or 1and1.com which will allow you to setup a domain name as well as forward that domain name to any IP address you choose. This is the solution documented in this article.
The remainder of this article will focus on setting up a WHS 2011 server for web hosting using the domain services of 1and1.com through a D-Link router.
How does web hosting work?
First, you must understand the internet is like a series of tubes. Just joking! Hosting a web server these days is fairly simple and there are many providers ready to get you online. The high-level requirements for hosting OBH are:
· Setup a Windows-based server (or PC) and enable Internet Information Services (IIS)
· Connect the server to the internet via your internet service provider (ISP); directly to a modem or through a router (if you have one) connected to your modem
· Configure your router to route port 80 to the internal IP address of your server. Example, an internet IP address will generally be of the form 192.168.0.1 but is based on your specific router settings
· Configure a domain name and forward that domain to the IP address of your router. For example, if my ISP provided a public IP address for me of 72.99.100.100 then www.<my-domain>.com could route to 72.99.100.100 (details will follow). You can setup a domain name forwarding solution using services such as godaddy.com, 1and1.com, or Rackspace.com.
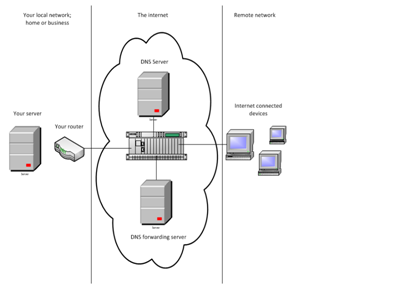
Reference figure 6 to grasp a high-level view of the internet. This simplified diagram narrows focus to each portion of the internet that we are concerned with when setting up a web-host. It is divided into three sections: your local network (your server and router), the internet (your ISP, domain name forwarding service, and domain name servers), and remote networks (everyone else).
Figure 6 – A simplified view of the internet
Your local network
Your local network is the location where your server and router are located; such as your home or business. Your router will have a public IP address associated with it. Your server will have a local IP address associated with it.
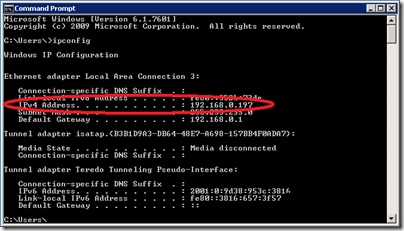
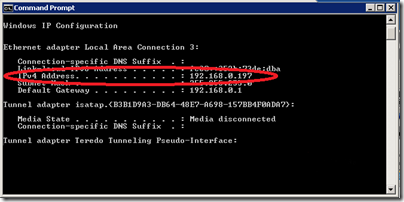
You can locate the local IP address of your server by logging into the server, running a command prompt, and typing ipconfig. The local IP address will be visible next to the IPv4 token. In my case, the internal IP address is 192.168.0.197
Figure 7 – locate the internal IP address of your server
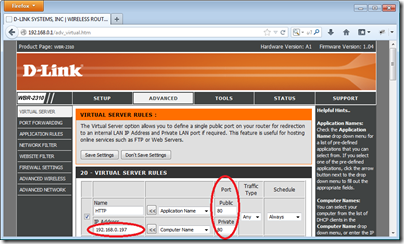
Now you must route the HTTP port (80) from your router to your server. You can do this directly in your router. Log into your router and locate the “port forwarding” page. For my D-Link router, it is under the Network | Advanced tab. Your router might differ; please consult your routers user’s manual for “port forwarding.”
Figure 8 – forward HTTP port 80 to your server
And finally, you must register your domain name (e.g. www.<my-domain>.com) and forward it to the global IP address of your router.
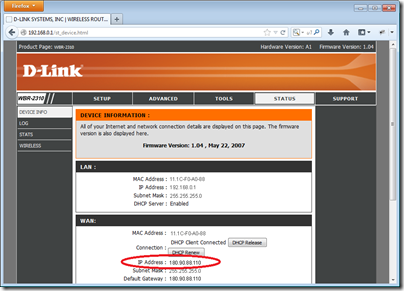
First, you must locate the global IP address of your router. This IP address is provided to you by your internet service provider (ISP). You can locate the IP address of your router by opening an internet browser and typing the routers local IP address (if you are not sure of the address then see your router documentation for the default local IP address. The IP address of the router is typically something like 192.168.0.1).
In my case, my home D-link router displays the routers IP address on the Status page.
Figure 9 – locating your router’s public IP address
Now that you know your routers public IP address you can route your domain name to your router. You can purchase a domain name for about $10/year from many different providers such as godaddy.com, 1and1.com, Rackspace.com, etc. Typically, a basic package will include one domain name for a small monthly fee. Registration is a simple process. Contact your preferred provider to open a new account if you don’t already have one; ask about “domain name forwarding.” They are there to help and will have detailed instructions guiding you through their specific service.
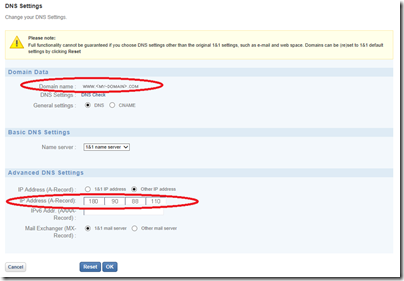
For my case, I use 1and1, the domain name forwarding option is found under Start | Domains | DNS | Edit DNS Settings. Simply enter the global IP address of your router, which you found above, and press OK.
Figure 10 – Forwarding your domain name to your router
Setting up Internet Information services
Internet Information Services (IIS) is a technology provided by Microsoft which runs on most Windows operating systems. IIS is a standard feature on Windows Server operating systems and also available on Professional, Business, and Ultimate versions Windows Desktop operating systems. If you already have a Windows PC or Server setup with an IIS enabled version of Windows then you can skip to the next section. If you are interested in finding out more about the IIS technology please visit the Microsoft IIS web site. Microsoft also has a walk-through describing how to setup a simple IIS website if you would prefer
Windows desktop systems
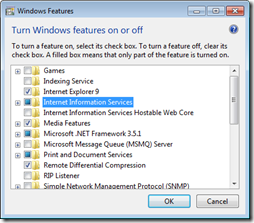
If you are running a professional version of Windows Desktop (Vista, 7, or 8) then you can install IIS via the Windows control panel (select Windows Start | Control Panel | Programs | Turn windows Feature on or off. Finally select “Internet Information Services”). You’ll also want to make sure the “ASP .NET” sub-feature is selected. Drill-down under the World Wide Web Services | Application Development Features and ensure the ASP.NET option is selected
Figure 11 – Windows Desktop IIS Options
Windows server systems
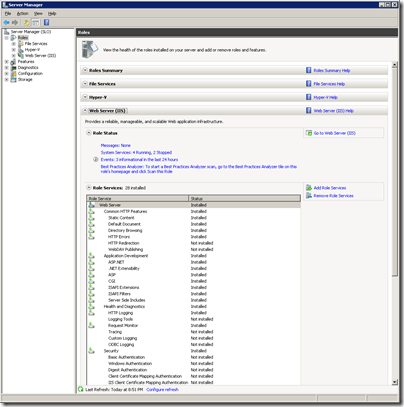
If you are running a Windows Server operating system such as Server 2008, Server 2012, Windows 2012 Essentials, Windows Home Server 2011, or Windows Storage Server R2 then you will install IIS as a Server Role. In this case, IIS is probably already installed and active on your server with no additional requirements on your part. If IIS is not already installed then launch the Server Manager and select Roles (click Windows Start | and type “Server Manager” and click the Server Manager icon). If IIS is not already installed then select Add Roles and select the “web-Server IIS” role
Figure 12 – Server 2008/2012 and WHS Role Manager
Verify Internet Information Services
Now that you have a domain name routed directly to your server and IIS is installed, you can verify Internet Information Services (IIS) is functioning correctly. You should verify connectivity to your server in discrete steps. This will allow you to easily identify which part of a connection is broken and allows you to focus on fixing the solution or requesting assistance from the proper vendor. First, ensure you have a simple website configured on your PC or Server. You can do this by following these steps from Microsoft or use the basic IIS home page included with a basic installation of IIS on Windows. Once the website is configured then follow each of these steps to ensure you have full connectivity to your Server or PC.
Verifying IIS via localhost
1. Log-in to your server (either physically or via Remote Desktop), open an internet browser and type the url “localhost”
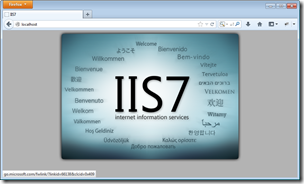
a. If the browser opens the website you just created (see example figure 13) then congratulations, IIS is configured on the server and you can go to step 2
Figure 13 – successful connection to IIS on LocalHost
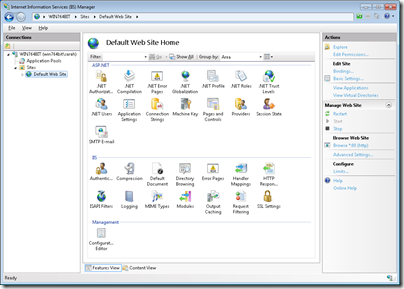
b. If the browser fails to load the page then you know IIS is not setup correctly on the server. Open the Internet Information Services Manager (Start | search for IIS) then select the “Web Server (IIS)” role, and drill-down into your default web site and make sure the “start” option has been selected. The “start” option should be disabled if the website is active (see figure 14)
Figure 14 – web site is activated
Verifying IIS within your local area network
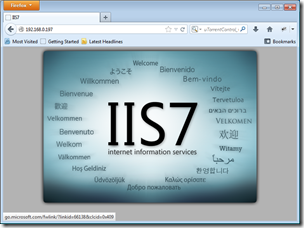
2. Log-in to a PC connected to the same local network (i.e. within your home or business) as your server, open an internet browser and enter the local intranet IP address of your server (e.g. 192.168.0.197). You can find the local intranet IP address by opening a command prompt on your server and typing “ipconfig” which will display the “IPv4 address” (see figure 7 above)
a. Just as with step 1, if the website loads then congratulations, IIS is configured on your server for intranet access
b. If the website does not load then you know IIS is correctly configured on the server but external access is failing. Verify the local IP address you entered is correct and matches the IP address you found using the ipconfig utility. If the IP address is correct then review your Windows firewall and anti-virus that are installed on the PC. It is possible the firewall or anti-virus is blocking http port 80 requests.
Figure 15 – locating the local IP address for testing
Figure 16 – successful connection to IIS in your local network
Verifying your domain name within your local area network
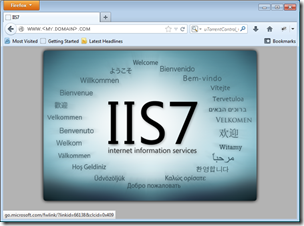
3. On the same PC you used for step 2, open an internet browser and type the url of your domain name (i.e. www.<my-domain>.com) for your server.
a. If the webpage opens then your server and local area network is configured correctly. Congratulations, you can move-on to step 4
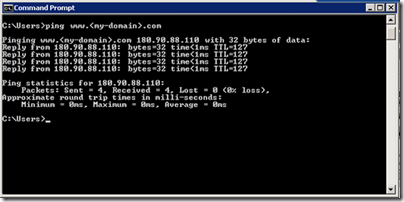
b. If the webpage does not open then there is an issue with your domain name registration. Verify you can access your domain name with a ping command (open a command prompt and enter ‘ping www.<my-domain>.com’ using the actual name of your domain. If the ping is not successful then contact your domain name provider (the provider who is forwarding your domain to your server) and ask for assistance.
Figure 17 – successful connection to IIS via the internet
Figure 18 – Verify DNS entry. Ping your domain name
4. The final step is to verify web access from a PC outside of your local internal network. Log-in to a PC or wireless device outside of your local network (i.e. at somebody else’s home or other business or using your mobile phone with local wireless disabled). Just as you did with the previous three steps, open an internet browser and enter the url of your domain name (i.e. www.<my-domain>.com) for your server
Success! IIS is configured on your server. Now you can install the OBH web service.
Wrap up
Now that you have a server or PC setup with IIS and a domain name you can install the OBH web-service and use your own private server to host your own online backup and file synchronization service. The third article in this series will cover the installation and configuration of the OBH service with details on creating and monitoring users, locally importing large backup sets, and creating device configuration files to allow users to connect to your storage server.
